Add Property
Overview
The Add Property wizard lets an agent register a new property and link it to an existing rate payer. The process is divided into 5 steps, each clearly shown in the progress bar at the top of the screen.
Navigate to: Home → Quick Actions → Add Property
or: Bottom Nav → Properties → + Add Property
  Step 1      Step 2        Step 3        Step 4        Step 5
Rate Payer → Property   →  Location   →  Documents  →  Review &
  Select       Info         & GIS                       Submit
Step 1 — Select Rate Payer
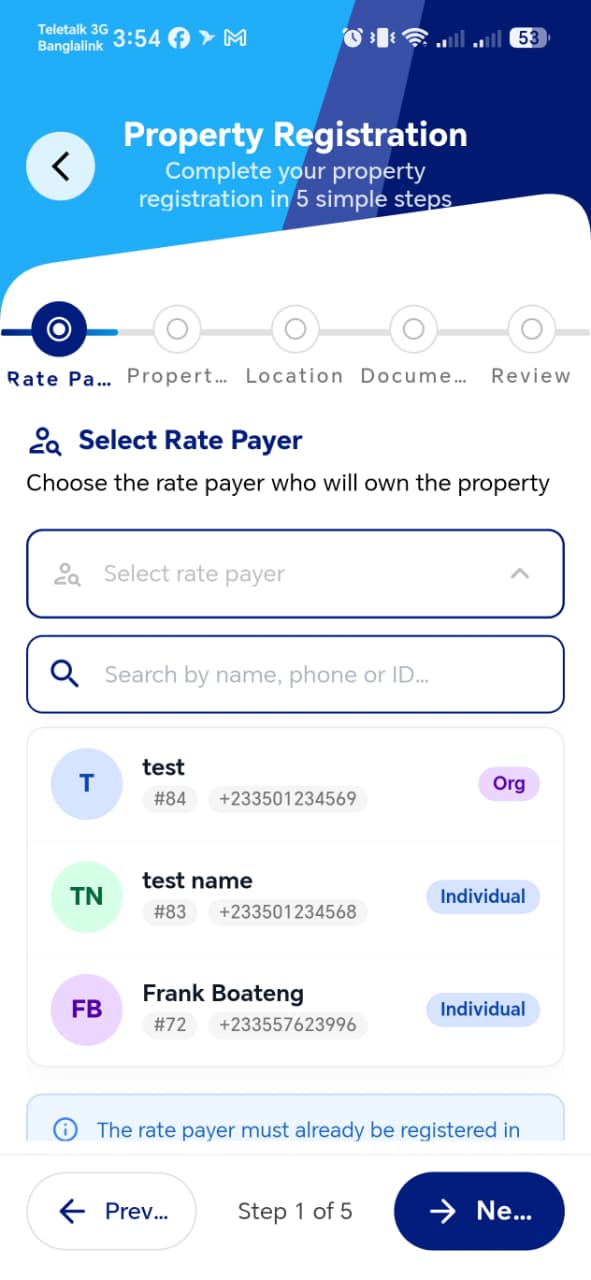
The first step links the property to an existing rate payer.
| Element | Description |
|---|---|
| Select rate payer dropdown | Tap to expand the rate payer picker |
| Search field | Search by name, phone number, or Rate Payer ID |
| Rate payer card | Shows initials avatar, name, ID number, phone, and type badge (Org or Individual) |
!!! warning "Rate Payer Must Already Exist" The rate payer must be registered in the system before adding a property. If the rate payer is not found, go to Rate Payers → Add Rate Payer first, then return to add the property.
!!! tip "Search Tips" Search by the rate payer's name, phone number, or ID number to quickly find them in the list.
Step 2 — Property Information

Basic details and classification of the property.
The selected rate payer is shown at the top of the form with a lock icon — confirming who this property will be linked to.
| Field | Required | Description |
|---|---|---|
| Property Name / Title | Optional | A descriptive name for the property (e.g. Test Property 1) |
| Ownership Type | ✅ Required | Dropdown — e.g. Single, Joint |
| Structure Type | ✅ Required | Dropdown — e.g. Permanent, Temporary |
| Land Size (sq.m.) | Optional | Numeric field, defaults to 0.00 |
!!! info "Locked Rate Payer" The rate payer card at the top shows a lock icon — this means the selection from Step 1 is locked. Tap Prev to go back and change it.
Step 3 — Location & GIS Information
This step captures the property's physical address and GPS coordinates. It is split across two screens due to the number of fields.
Location Permission
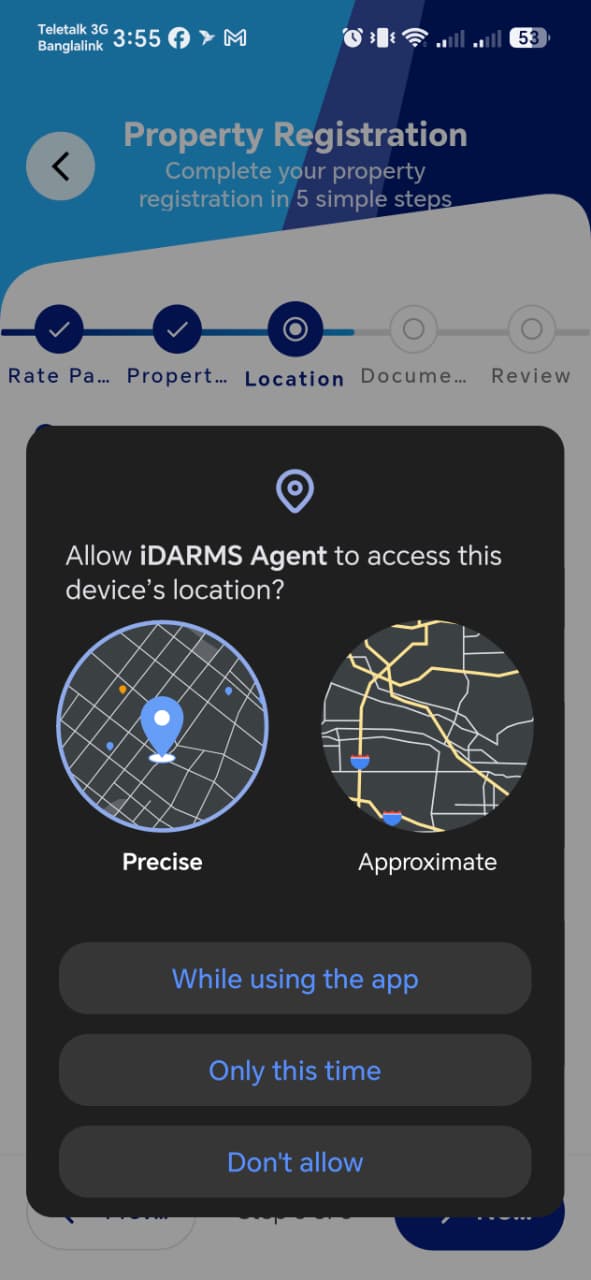
When entering Step 3 for the first time, the OS prompts for location access.
| Option | Description |
|---|---|
| Precise | Recommended — uses exact GPS coordinates |
| Approximate | Less accurate — not recommended for property registration |
| While using the app | Grants access only when app is open |
| Only this time | Single-use permission |
| Don't allow | Disables GPS — coordinates must be entered manually |
!!! warning "Always Choose Precise" Select Precise + While using the app to ensure accurate GPS coordinates are captured for the property. Approximate location may result in incorrect coordinates being registered.
Location & GIS Fields — Top
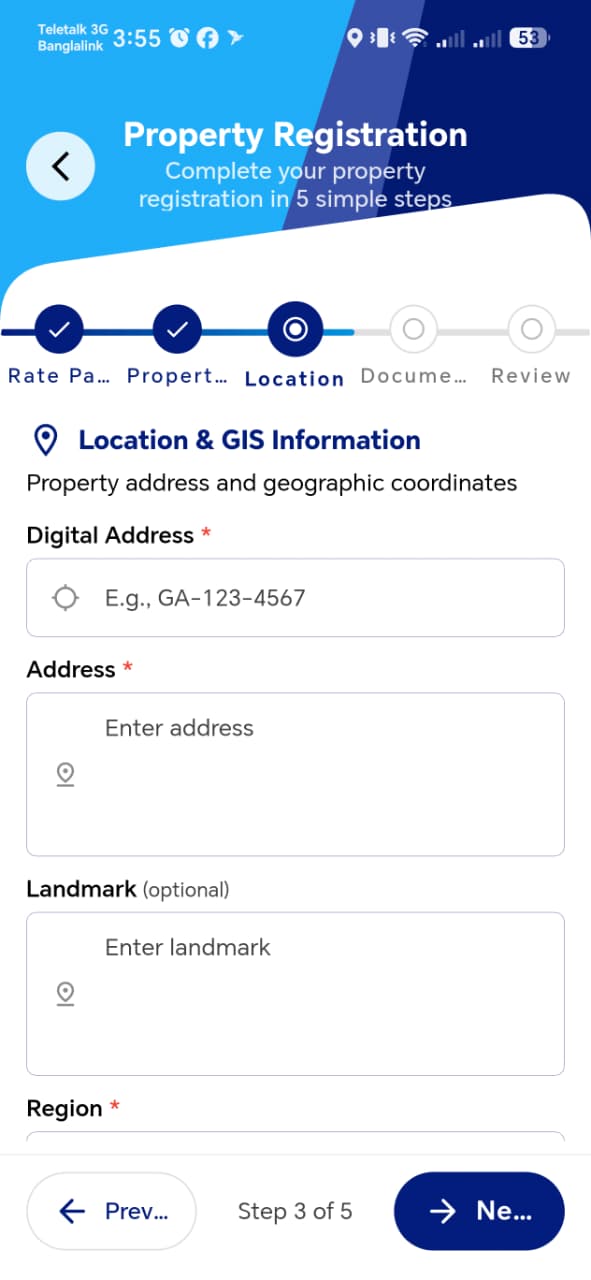
| Field | Required | Description |
|---|---|---|
| Digital Address | ✅ Required | Ghana Post digital address format: GA-123-4567 |
| Address | ✅ Required | Full physical address of the property |
| Landmark | Optional | Nearby landmark to help locate the property |
| Region | ✅ Required | Dropdown — select the region |
!!! info "Digital Address Format"
The Digital Address must follow the Ghana Post format:
GA-XXX-XXXX or GA-XXXX-XXXX
The field will show a validation error if the format is incorrect.
Location & GIS Fields — Bottom
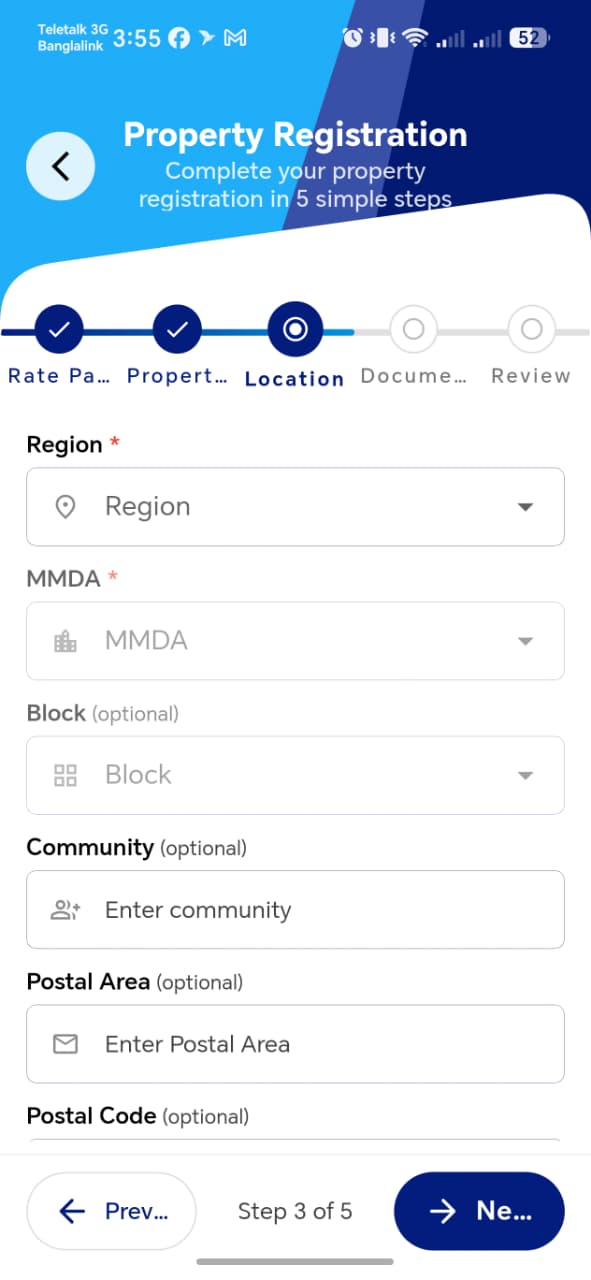
| Field | Required | Description |
|---|---|---|
| MMDA | ✅ Required | Dropdown — filtered by selected Region |
| Block | Optional | Dropdown — filtered by selected MMDA |
| Community | Optional | Free text |
| Postal Area | Optional | Free text |
| Postal Code | Optional | Free text |
!!! warning "Region → MMDA Dependency" Always select Region first. The MMDA dropdown will only populate after a region is chosen. Similarly, Block options depend on the selected MMDA.
GPS Coordinates
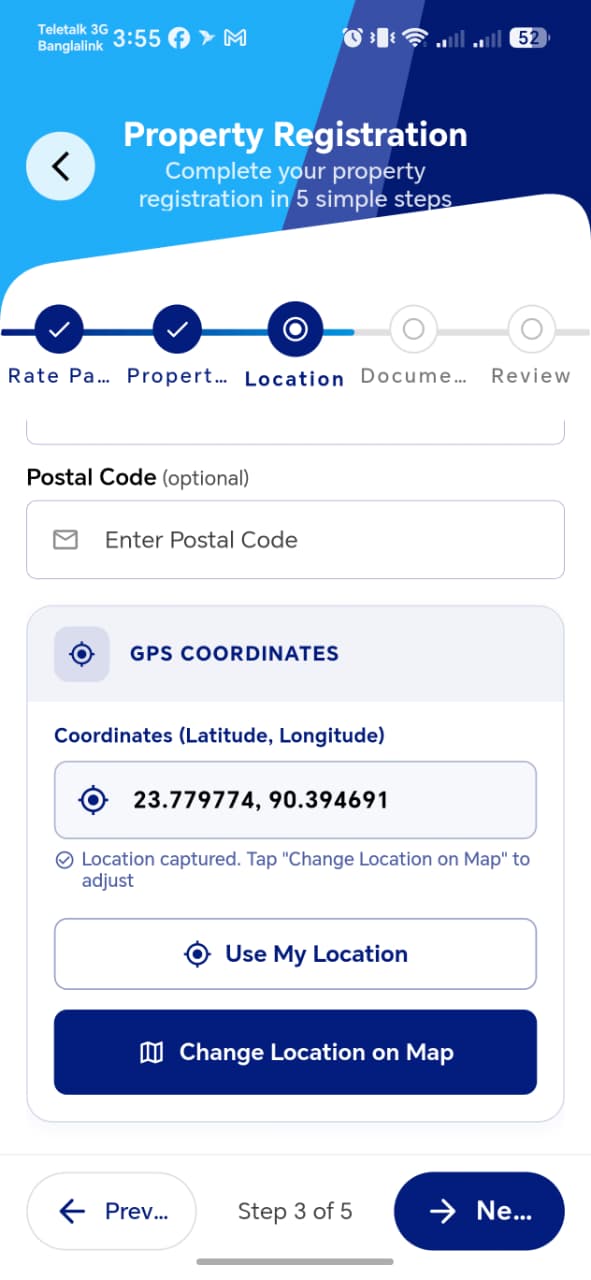
| Element | Description |
|---|---|
| Coordinates field | Auto-filled with current device location (Latitude, Longitude) |
| Location captured message | Confirms GPS coordinates have been detected |
| Use My Location | Re-captures the device's current GPS position |
| Change Location on Map | Opens an interactive map to manually adjust the pin |
!!! tip "Adjusting Coordinates" If the auto-detected location is slightly off, tap Change Location on Map to drag the pin to the exact property location.
Step 4 — Documents
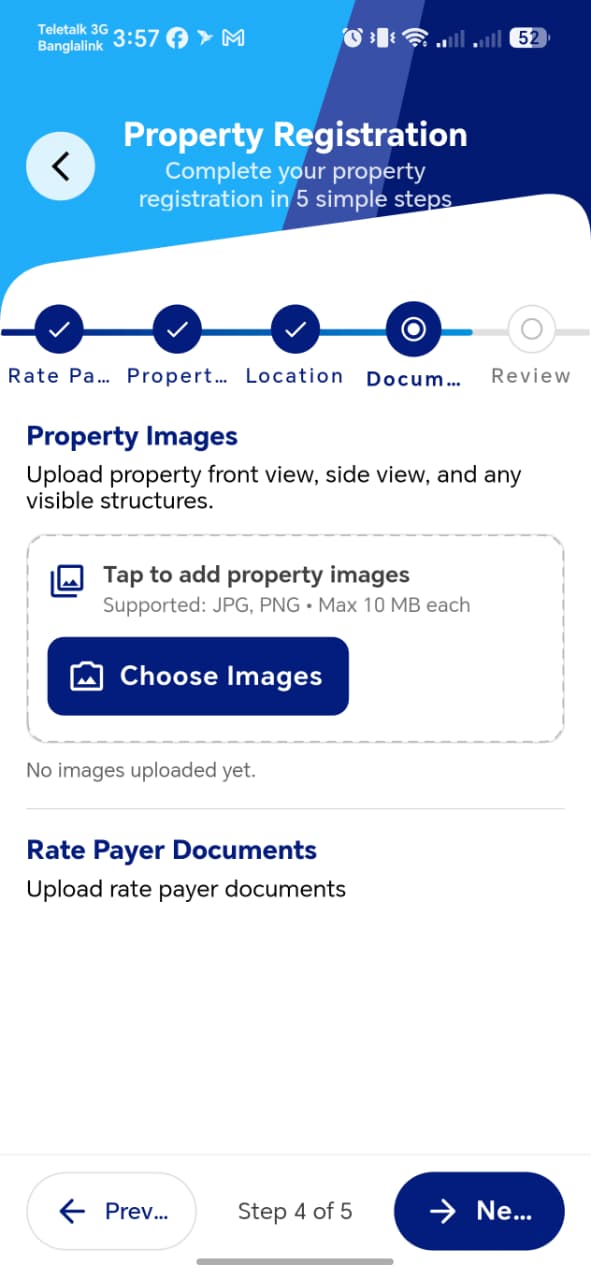
Upload property images and supporting documents. This entire step is optional.
Property Images
| Element | Description |
|---|---|
| Tap to add property images | Opens device image picker |
| Choose Images button | Alternative button to open image picker |
| Supported formats | JPG, PNG |
| Max file size | 10 MB per image |
Upload front view, side view, and any visible structures of the property.
Rate Payer Documents
Upload any supporting documents related to the rate payer for this property.
!!! info "Step is Optional"
You can proceed to Step 5 without uploading any files.
The review screen will show 0 file(s) for each document type,
which is acceptable.
Step 5 — Review & Submit
This step shows a full summary of all information entered across Steps 1–4. Each section has an Edit link to go back and make corrections without losing data from other steps.
Property Information Summary
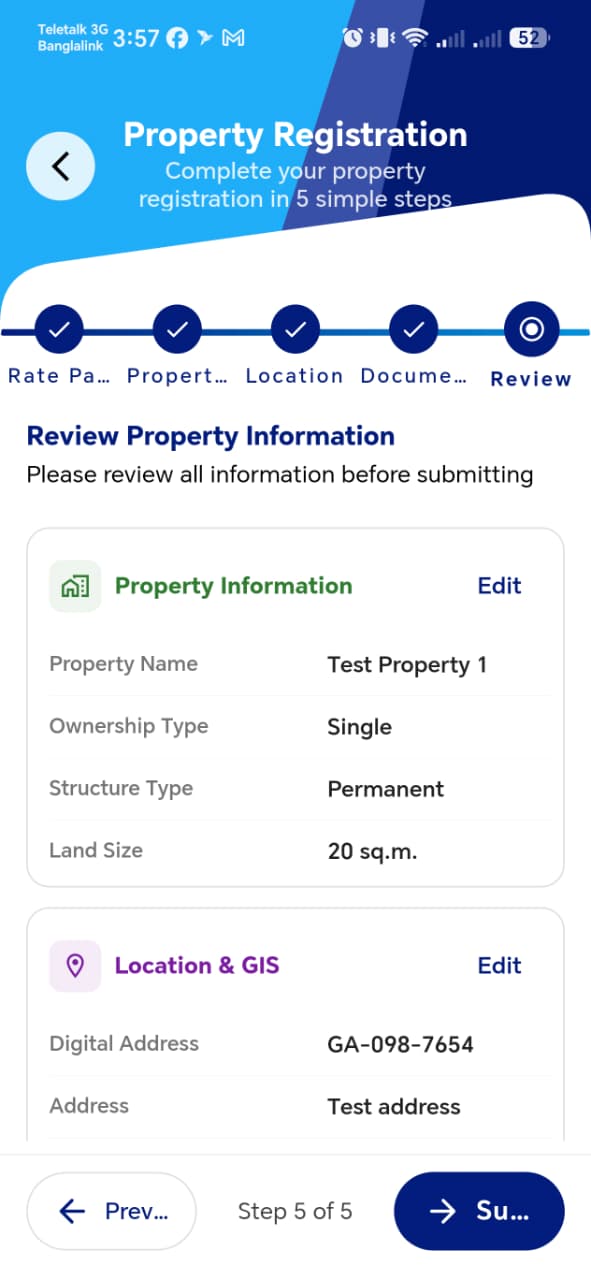
| Section | Fields Shown |
|---|---|
| Property Information | Property Name, Ownership Type, Structure Type, Land Size |
| Location & GIS | Digital Address, Address, Landmark, Region, MMDA, Community, Postal Area, Postal Code, Coordinates |
Location Summary

| Section | Fields Shown |
|---|---|
| Location | Location details |
Documents Summary

| Section | Fields Shown |
|---|---|
| Documents | Property Images count, Ownership Proof count, Land Deed count |
| Summary bar | Total Property Images uploaded, Total Supporting Documents uploaded |
!!! warning "Review Carefully Before Submitting" Once you tap Submit, the property is registered in the system. The confirmation message at the bottom of Step 5 states: "Please review all the information above carefully. Once you submit, the property will be registered in the system."
Submitting
Tap the Submit (Su...) button at the bottom right to complete registration.
Success Screen

On successful submission, a green Success banner appears:
Property registered successfully.
The app returns to the Dashboard (Home), where the Property Registered counter in the Overview section increments by 1.
Navigation Controls
| Button | Action |
|---|---|
| ← Prev | Go back to the previous step (data is retained) |
| → Next (Ne...) | Proceed to the next step |
| → Submit (Su...) | Final submission on Step 5 |
| Step indicator | Shows current step (e.g. Step 2 of 5) |
Test Suggestions
!!! tip "Rate Payer Prerequisite Test" Attempt to add a property without any registered rate payers. Verify the rate payer picker shows an empty list and the agent cannot proceed to Step 2 without selecting one.
!!! tip "Digital Address Validation Test"
Enter an incorrectly formatted digital address (e.g. 1234-ABCD).
Verify the system shows a format validation error and prevents
proceeding to Step 4.
!!! tip "Region → MMDA Dependency Test" Select a Region and verify the MMDA dropdown populates. Change the region and verify MMDA resets and repopulates accordingly.
!!! tip "GPS Auto-Fill Test" Enter Step 3 with location permission granted. Verify the Coordinates field auto-fills with the device's current latitude and longitude.
!!! tip "Edit from Review Test" On Step 5, tap Edit next to Property Information. Change a field, tap Next back to Step 5, and verify the updated value appears in the review summary.
!!! tip "Empty Documents Test"
Complete all steps without uploading any documents.
Verify Step 5 shows 0 file(s) for all document types
and submission still succeeds.
!!! tip "Success Counter Test" Note the Property Registered count on the Dashboard before adding. Complete a full property registration and verify the counter increments by 1 on return to the Dashboard.