Bills & Payments
Overview
The Bills & Payments module allows agents to collect payments on behalf of rate payers. Unlike Bill Distribution (which is about delivering bills), this module handles the actual payment collection — full or partial — with OTP verification before every transaction.
Navigate to: Home → Bills & Payments button
Bills & Payments List
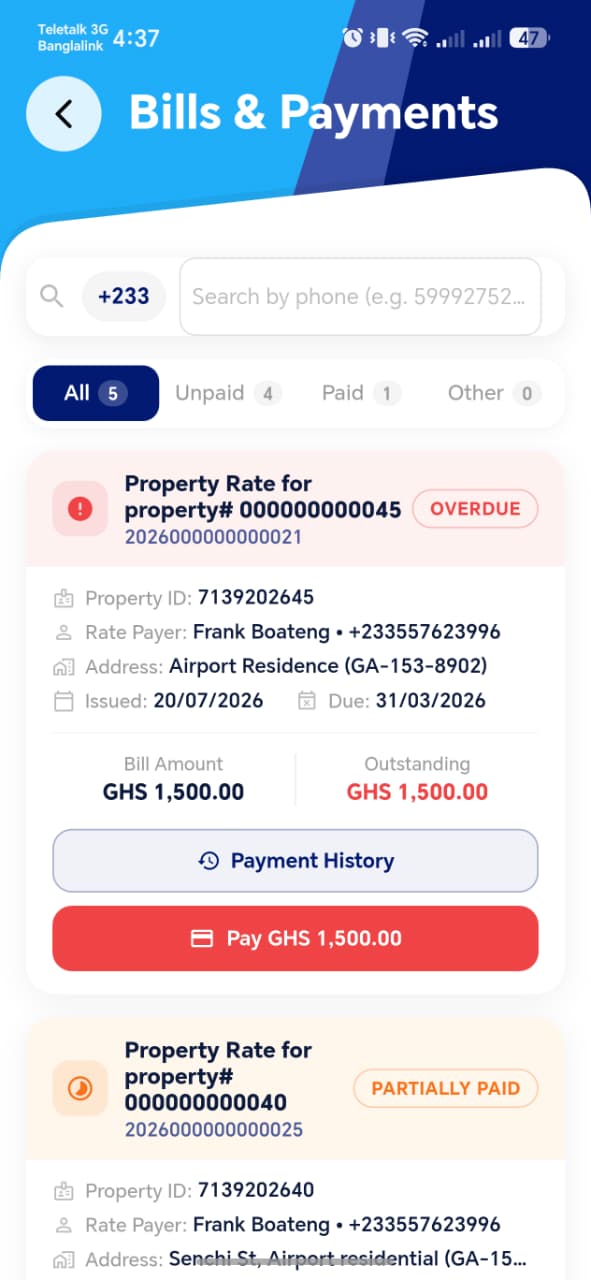
List Features
| Element | Description |
|---|---|
| Search bar | Search by rate payer phone number (e.g. +233 599927527) |
| All / Unpaid / Paid / Other tabs | Filter bills by payment status with count badges |
| Bill card | Shows bill details, payment status, and action buttons |
Payment Status Filter Tabs
| Tab | Meaning |
|---|---|
| All | Every bill assigned to this agent |
| Unpaid | Bills with no payment made yet |
| Paid | Bills fully paid |
| Other | Bills in other states (e.g. overdue, partially paid) |
Bill Card
Each card shows:
| Field | Description |
|---|---|
| Status icon | Red (!) for overdue, orange (⏱) for partially paid |
| Property Rate title | Property reference description |
| Bill No | Unique bill number (shown in blue below title) |
| Status badge | OVERDUE, PARTIALLY PAID, PAID, UNPAID |
| Property ID | Unique property identifier |
| Rate Payer | Name and phone number |
| Address | Property address with digital address |
| Issued / Due | Issue date and payment due date |
| Bill Amount | Total bill amount |
| Outstanding | Remaining unpaid balance in red |
Bill Status Badges
| Badge | Colour | Meaning |
|---|---|---|
OVERDUE |
Red | Past due date with unpaid balance |
PARTIALLY PAID |
Orange | Some payments made but balance remains |
PAID |
Green | Bill fully settled |
UNPAID |
Grey | No payment made yet |
Action Buttons Per Bill
| Payment State | Buttons Available |
|---|---|
| No payment made yet | Payment History, Pay GHS X.XX |
| At least one payment made | Payment History, Receipt, Pay GHS X.XX |
!!! info "Receipt Button Appears After First Payment" The Receipt button only appears once at least one payment has been recorded against a bill. For bills with no payments, only Payment History and Pay are shown.
Payment History
Tapping Payment History opens a bottom sheet showing all individual payments made against that bill.
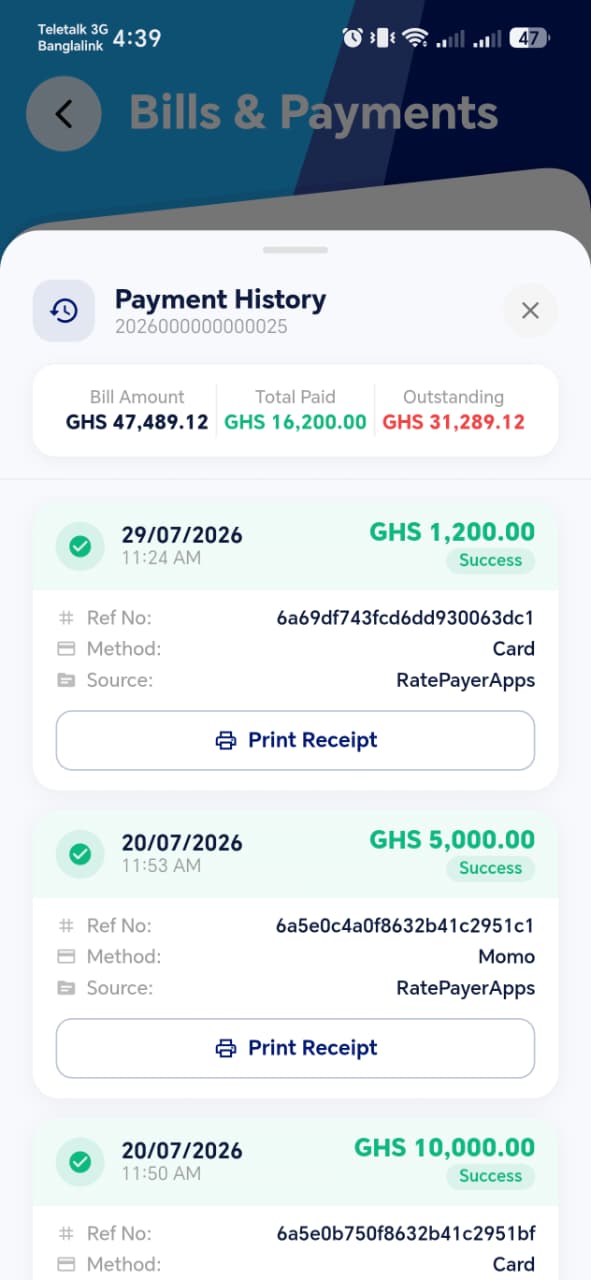
Summary Bar
At the top of the Payment History sheet:
| Field | Description |
|---|---|
| Bill Amount | Total bill value |
| Total Paid | Sum of all payments made (green) |
| Outstanding | Remaining balance (red) |
Individual Payment Entry
Each payment in the list shows:
| Field | Description |
|---|---|
| ✅ icon | Green checkmark confirms successful payment |
| Date & time | When the payment was made |
| Amount | Payment amount in green |
| Success tag | Confirms payment status |
| Ref No | Unique payment reference number |
| Method | Payment method (e.g. Card, Momo) |
| Source | Origin of payment (e.g. RatePayerApps) |
| Print Receipt button | Generates a receipt for this individual payment only |
!!! info "Individual vs Summary Receipt" Print Receipt in Payment History generates a receipt for that single payment only. The Receipt button on the bill card generates a combined summary receipt covering all payments made against that bill. Both are available for printing or PDF export.
Receipt Preview (Individual Payment)
Tapping Print Receipt in Payment History opens the Receipt Preview.
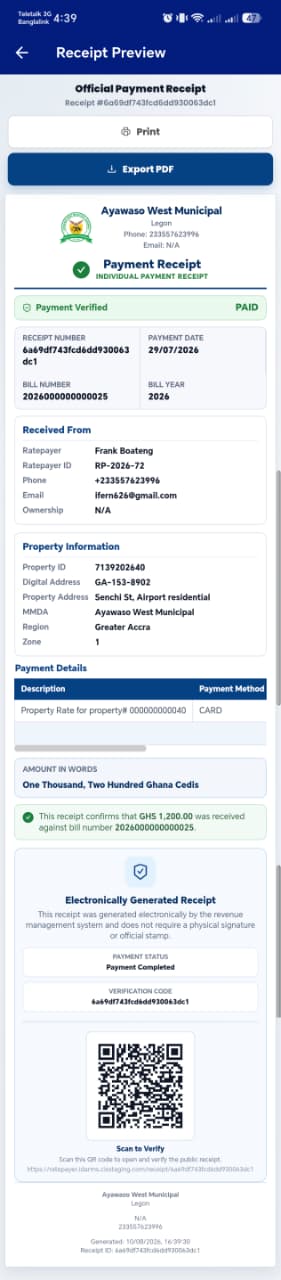
The Official Payment Receipt contains:
Header:
- Municipal council name, address, phone
- INDIVIDUAL PAYMENT RECEIPT label
- Payment Verified and PAID status
Receipt Details: | Field | Description | |---|---| | Receipt Number | Unique receipt reference | | Payment Date | Date of this payment | | Bill Number | Associated bill number | | Bill Year | Year the bill covers |
Received From:
| Field | Description |
|---|---|
| Ratepayer | Full name |
| Ratepayer ID | e.g. RP-2026-72 |
| Phone | Contact number |
| Email | Email address |
| Ownership | Property ownership type |
Property Information: | Field | Description | |---|---| | Property ID | Unique property ID | | Digital Address | Ghana Post address | | Property Address | Physical address | | MMDA | Municipal district | | Region | Region | | Zone | Zone number |
Payment Details:
| Field | Description |
|---|---|
| Description | e.g. Property Rate for property# XXXXXX |
| Payment Method | e.g. CARD |
| Amount in Words | Written out (e.g. One Thousand, Two Hundred Ghana Cedis) |
| Confirmation | "This receipt confirms that GHS X,XXX.XX was received against bill number XXXX" |
Verification:
- Electronically Generated Receipt notice
- Payment Status: Payment Completed
- Verification Code (unique hash)
- QR Code — scan to verify the receipt publicly online
Actions: | Button | Action | |---|---| | Print | Sends to connected printer | | Export PDF | Saves as PDF file |
POS Receipt (Payment)
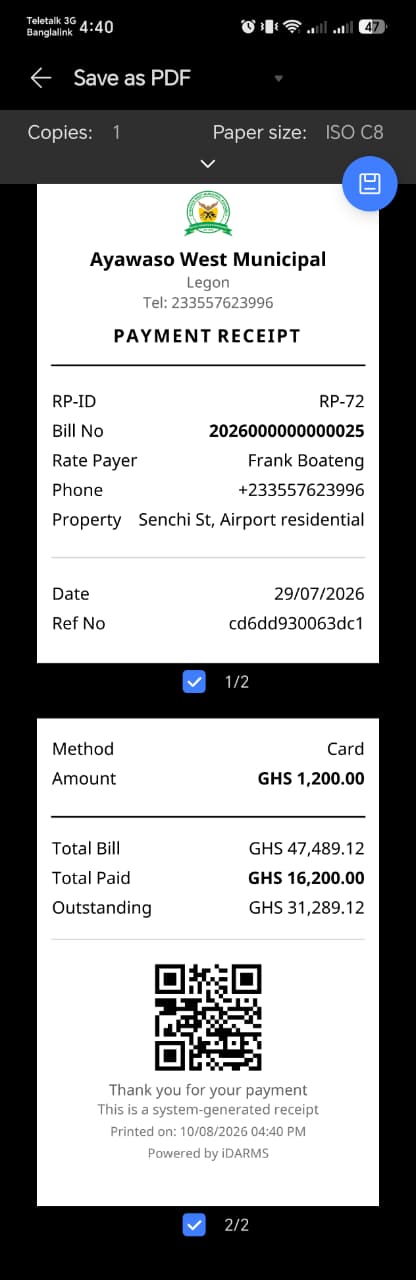
Compact thermal format for POS devices (ISO C8 paper, 2 pages):
- Page 1: Municipal header, PAYMENT RECEIPT title, RP-ID, Bill No, Rate Payer name, phone, property, date, ref no
- Page 2: Method, Amount, Total Bill, Total Paid, Outstanding, QR code, footer
Consolidated Payment Receipt (Receipt Button on Bill Card)
The Receipt button on a bill card generates a single receipt that covers all payments ever made against that bill — not just one. This is different from the individual Print Receipt inside Payment History.
When It Appears
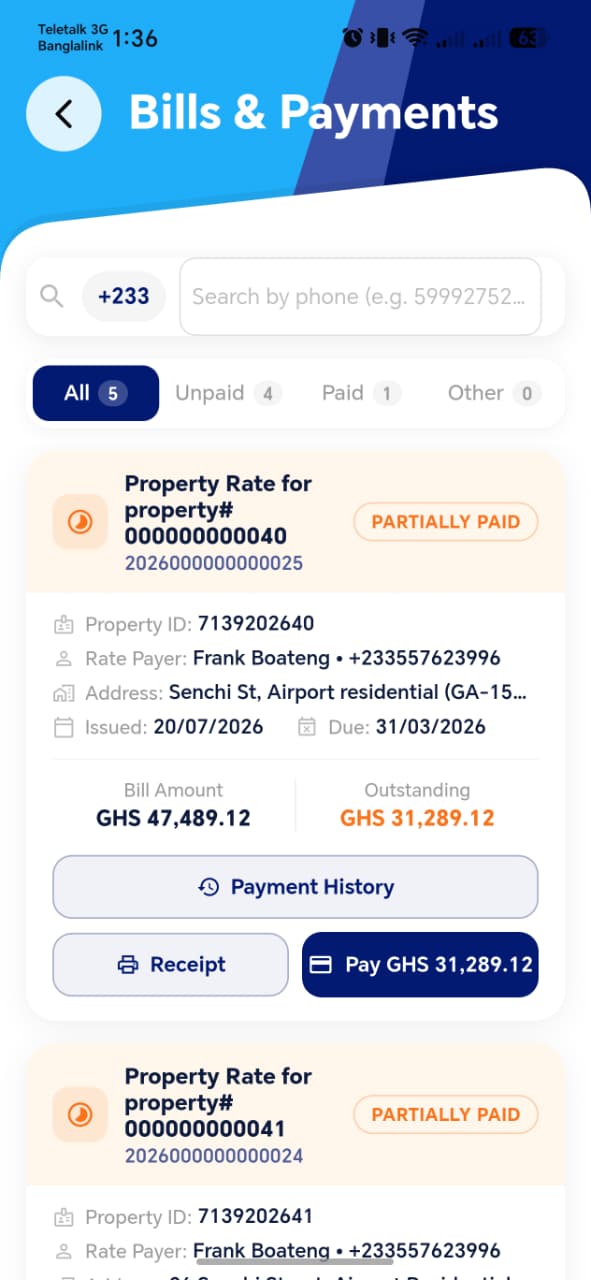
The Receipt button appears on the bill card only after at least one payment has been recorded. It sits between Payment History and Pay.
Consolidated Receipt Preview
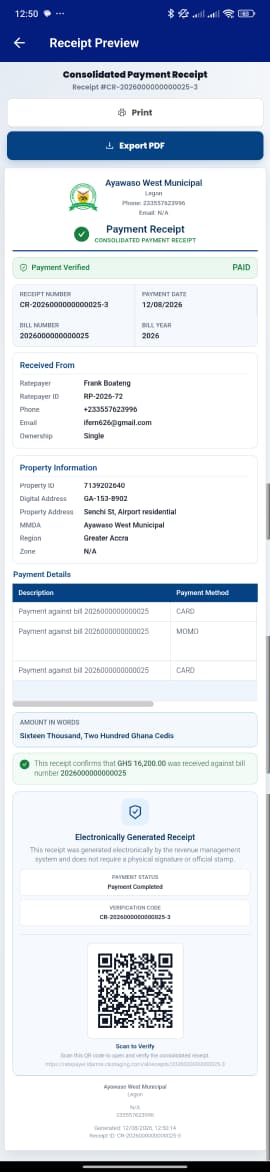
The Consolidated Payment Receipt screen shows:
Header:
- Consolidated Payment Receipt label
- Receipt reference number (e.g. CR-20260000000000025-3)
- Municipal council name, phone
- CONSOLIDATED PAYMENT RECEIPT label
- Payment Verified and PAID status
Receipt Details:
| Field | Description |
|---|---|
| Receipt Number | Unique consolidated receipt reference (prefix CR-) |
| Payment Date | Date this consolidated receipt was generated |
| Bill Number | The bill all payments belong to |
| Bill Year | Year the bill covers |
Received From:
| Field | Description |
|---|---|
| Ratepayer | Full name |
| Ratepayer ID | e.g. RP-2026-72 |
| Phone | Contact number |
| Email | Email address |
| Ownership | Property ownership type |
Property Information: | Field | Description | |---|---| | Property ID | Unique property ID | | Digital Address | Ghana Post address | | Property Address | Physical address | | MMDA | Municipal district | | Region | Region | | Zone | Zone number |
Payment Details Table:
Lists every payment made against this bill:
| Description | Payment Method |
|---|---|
| Payment against bill XXXX | CARD |
| Payment against bill XXXX | MOMO |
| Payment against bill XXXX | CARD |
Amount in Words: Total of all combined payments written out (e.g. Sixteen Thousand, Two Hundred Ghana Cedis)
Confirmation:
"This receipt confirms that GHS 16,200.00 was received against bill number 20260000000000025"
Verification:
- Electronically Generated Receipt notice
- Payment Status: Payment Completed
- Verification Code (unique hash prefixed CB-)
- QR Code — scan to verify consolidated receipt online
Actions: | Button | Action | |---|---| | Print | Sends to connected printer | | Export PDF | Saves as PDF |
Consolidated POS Receipt

The POS thermal format for the consolidated receipt uses ISO C8 paper and spans 4 pages:
- Page 1: Municipal header, PAYMENT RECEIPT title, RP-ID, Bill No, Rate Payer name, phone, property,
PAYMENT HISTORYheading - Page 2: Individual payment entries — each with Date, Ref, Method, Amount (Payment 1, Payment 2...)
- Page 3: Payment 3 details + Total Bill, Total Paid, Outstanding summary + QR code
- Page 4: "Thank you for your payment. This is a system-generated receipt. Printed on: [date]. Powered by iDARMS"
Individual vs Consolidated Receipt — Key Difference
| Individual Receipt | Consolidated Receipt | |
|---|---|---|
| Accessed from | Payment History → Print Receipt | Bill card → Receipt button |
| Receipt prefix | # (hash ref) |
CR- (Consolidated Receipt) |
| Covers | One single payment | All payments on the bill |
| Payment details | One row in Payment Details | All payment rows listed |
| Amount confirmed | Single payment amount | Grand total of all payments |
| POS pages | 2 pages | 4 pages |
| Use case | Proof of one transaction | Full payment history summary |
Pay — Payment Collection Workflow
Step 1 — Confirm Payment Dialog
Tapping the Pay GHS X.XX button opens a confirmation dialog.
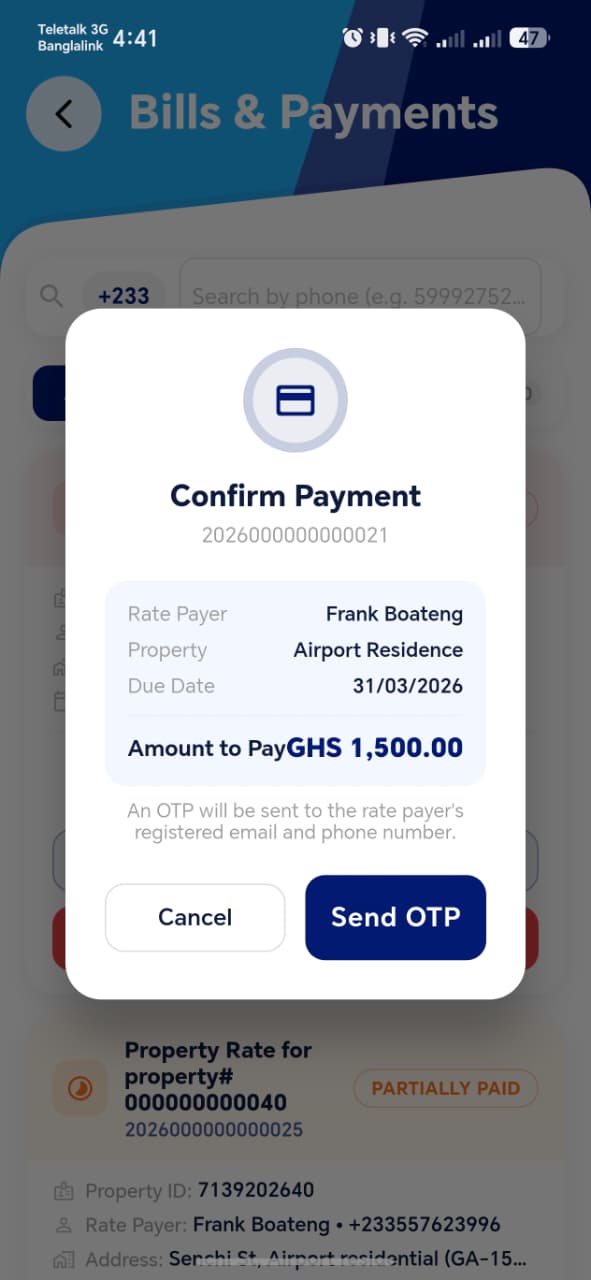
| Field | Description |
|---|---|
| Bill No | The bill being paid |
| Rate Payer | Name of the rate payer |
| Property | Property name/address |
| Due Date | Payment deadline |
| Amount to Pay | Full outstanding amount |
"An OTP will be sent to the rate payer's registered email and phone number."
| Button | Action |
|---|---|
| Send OTP | Sends OTP to rate payer and proceeds to verification |
| Cancel | Returns to the bill list |
!!! warning "OTP is Mandatory" Every payment requires OTP verification from the rate payer. The agent cannot bypass this step. The OTP is sent to the rate payer's registered phone and email simultaneously.
Step 2 — Enter OTP
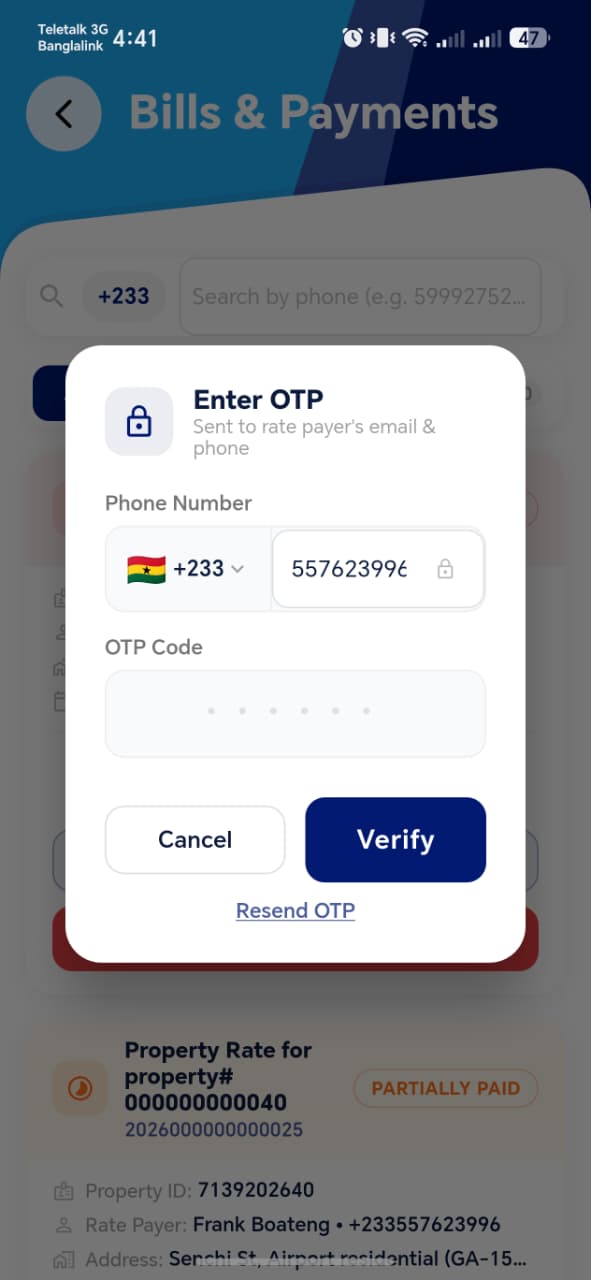
After tapping Send OTP, the OTP entry dialog appears:
| Field | Description |
|---|---|
| Phone Number | Pre-filled with rate payer's registered number (locked) |
| OTP Code | 6-digit code sent to the rate payer |
| Button | Action |
|---|---|
| Verify | Validates the OTP — proceeds if correct |
| Cancel | Cancels the payment process |
| Resend OTP | Sends a new OTP if the rate payer didn't receive it |
!!! tip "OTP Delivery" The rate payer receives the OTP on both their phone and email. If not received, tap Resend OTP. The agent should ask the rate payer to check their phone and email before resending.
Step 3 — Amount Entry (After OTP Verified)
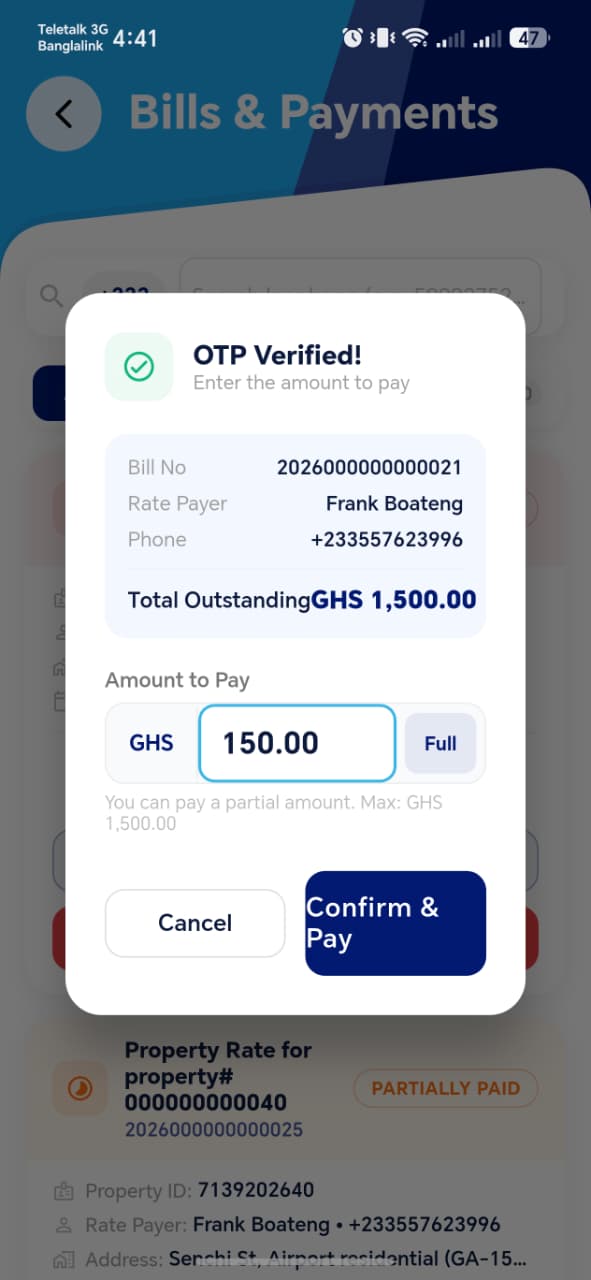
After successful OTP verification, a green confirmation appears:
✅ OTP Verified! Enter the amount to pay
The payment entry form shows:
| Field | Description |
|---|---|
| Bill No | Bill reference |
| Rate Payer | Name |
| Phone | Contact number |
| Total Outstanding | Full remaining balance |
| Amount to Pay | Editable field — enter partial or full amount |
| Full button | Auto-fills the full outstanding amount |
"You can pay a partial amount. Max: GHS X,XXX.XX"
| Button | Action |
|---|---|
| Confirm & Pay | Processes the payment |
| Cancel | Cancels without paying |
!!! tip "Partial Payment" The agent can enter any amount up to the outstanding balance. Tap Full to auto-fill the complete outstanding amount. Partial payments reduce the outstanding balance and are recorded individually in Payment History.
Step 4 — Payment Successful
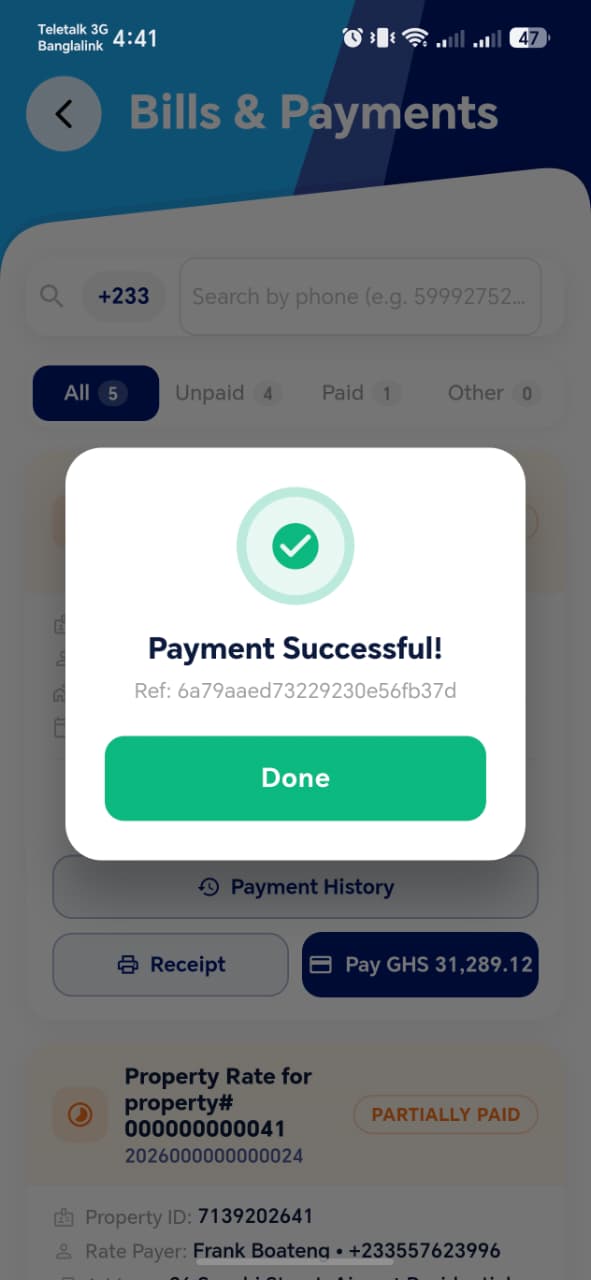
On successful payment, a popup appears:
✅ Payment Successful! Ref: [unique reference number]
Tap Done to dismiss and return to the bill list.
The bill card updates immediately:
- Outstanding balance decreases by the paid amount
- If fully paid: badge changes to PAID
- If partially paid: badge remains PARTIALLY PAID
- Receipt button now appears on the bill card
Complete Payment Workflow
Bills & Payments List
        ↓
Select bill → tap Pay GHS X.XX
        ↓
Confirm Payment dialog → tap Send OTP
        ↓
OTP sent to rate payer's phone + email
        ↓
Rate payer provides OTP → agent enters it → tap Verify
        ↓
OTP Verified ✅ → Enter Amount to Pay
        ↓
Enter partial or full amount → tap Confirm & Pay
        ↓
Payment Successful ✅ → Ref number shown
        ↓
Bill card updates → Receipt button appears
Bill Distribution vs Bills & Payments
| Feature | Bill Distribution | Bills & Payments |
|---|---|---|
| Purpose | Deliver/print bills | Collect payments |
| Print formats | Regular Bill, POS Receipt | Payment Receipt, POS Receipt |
| OTP required | ❌ No | ✅ Yes — before every payment |
| Mark action | Mark Distributed | Confirm & Pay |
| History | ❌ No payment history | ✅ Full payment history per bill |
| Partial payment | ❌ Not applicable | ✅ Supported |
Test Suggestions
!!! tip "Filter Tab Test" Check each tab (Unpaid, Paid, Other) and verify bills are correctly categorised. Verify counts on each tab match the visible cards.
!!! tip "Overdue Badge Test"
Find a bill past its due date with unpaid balance.
Verify it shows the red OVERDUE badge and red outstanding amount.
!!! tip "OTP Flow Test" Tap Pay on a bill. Verify the Confirm Payment dialog shows correct rate payer name, property, and amount. Tap Send OTP and verify the OTP entry dialog appears with the rate payer's phone pre-filled.
!!! tip "Partial Payment Test" Enter an amount less than the outstanding balance. Verify payment succeeds. Check Payment History and confirm a new entry appears with the exact amount paid. Verify outstanding balance on the bill card decreased correctly.
!!! tip "Full Payment Button Test" In the amount entry dialog, tap Full. Verify the amount field auto-fills with the exact outstanding balance.
!!! tip "Receipt Appearance Test" Before any payment: verify the Receipt button does NOT appear. Make one payment. Verify the Receipt button NOW appears on the bill card.
!!! tip "Individual vs Summary Receipt Test" Make 2 separate payments against the same bill. Open Payment History and tap Print Receipt on the first payment — verify it shows only that payment's amount. Go back and tap the Receipt button on the bill card — verify it shows the combined total of both payments.
!!! tip "Payment Success Counter Test" Note the outstanding amount before paying. Complete a partial payment. Tap Done. Verify the outstanding amount on the bill card reduced by the exact amount paid.
!!! tip "Consolidated Receipt Test" Make 3 separate partial payments against the same bill using different payment methods (e.g. Card, Momo, Card). Tap the Receipt button on the bill card. Verify the Consolidated Receipt shows all 3 payments listed in the Payment Details table, and the total confirmed amount equals the sum of all 3 payments.
!!! tip "Consolidated Receipt QR Test" Open a Consolidated Receipt and scan the QR code using any QR scanner. Verify it opens the public receipt verification URL and displays the correct payment details online.
!!! tip "Consolidated vs Individual Receipt Prefix Test"
Open a receipt from Payment History — verify the receipt number
starts with a hash reference (individual).
Open the Receipt from the bill card — verify the receipt number
starts with CR- (consolidated).