Property Inspection
Overview
The Property Inspection module allows agents to conduct and submit field inspections for properties assigned to them. The workflow enforces geofence verification — the agent must be physically within 40 metres of the property before inspection can proceed.
Navigate to: Bottom Navigation → Inspection
Inspection List → Select Property → Location Check → Verify Address → Submit Inspection
Inspection List
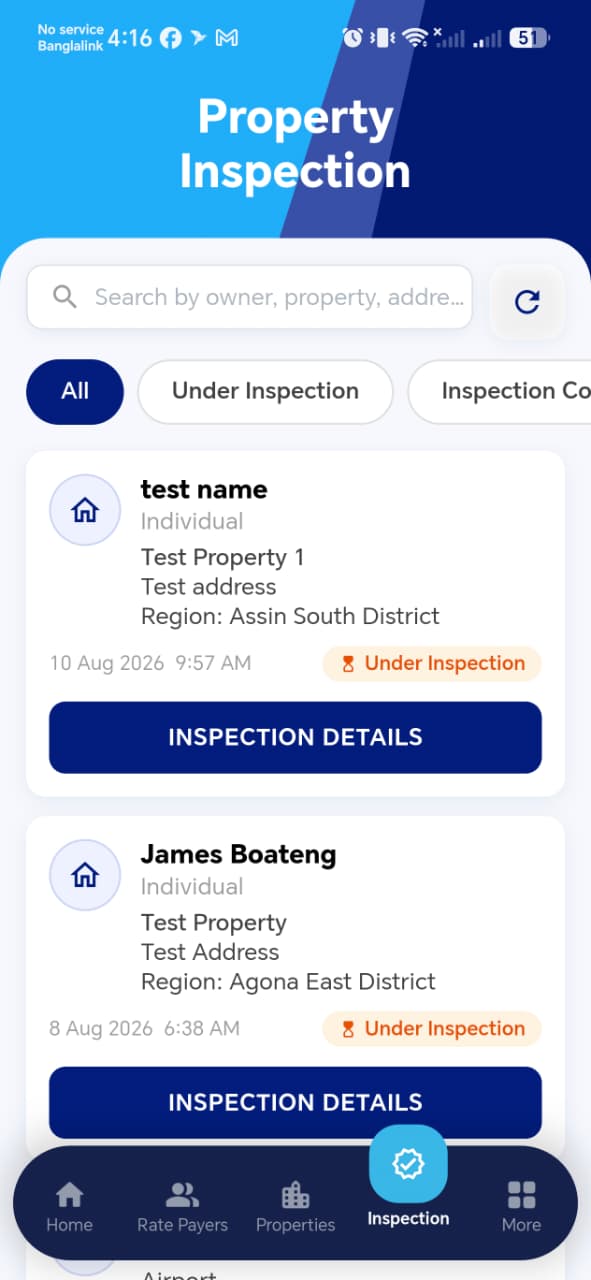
The Property Inspection screen lists all properties assigned to this agent for inspection.
List Features
| Element | Description |
|---|---|
| Search bar | Search by owner name, property name, or address |
| Refresh (↺) | Reload the inspection list |
| All / Under Inspection / Inspection Co... tabs | Filter by inspection status |
| Property card | Shows rate payer name, type, property name, address, region, date/time, and status badge |
| INSPECTION DETAILS button | Opens the inspection details and workflow for that property inspection |
Property Card
| Element | Description |
|---|---|
| House icon | Avatar for the property |
| Rate payer name | Name of the owner (e.g. test name, James Boateng) |
| Type | Individual or Organisation |
| Property name | Registered property name |
| Address | Physical address |
| Region | District or municipal area |
| Date & time | When the property was assigned for inspection |
| Status badge | Current inspection status |
Inspection Status Badges
| Badge | Colour | Meaning |
|---|---|---|
Under Inspection |
Orange | Assigned — inspection started but not yet submitted |
Inspection Completed |
Green | Inspection report successfully submitted |
Status Filter Tabs
| Tab | Shows |
|---|---|
| All | All assigned properties regardless of status |
| Under Inspection | Only properties with active/ongoing inspections |
| Inspection Co... | Only completed inspections |
Step 1 — Location Permission

When tapping INSPECTION DETAILS for the first time, the app requests location access and simultaneously begins the geofence check.
| Status message | Meaning |
|---|---|
| Verifying your location... | App is checking if the agent is within range |
| Checking that you are in the correct inspection area | Geofence validation in progress |
Location Permission Options
| Option | Recommendation |
|---|---|
| Precise | ✅ Always choose this — required for accurate geofence check |
| Approximate | ❌ Not recommended — may fail geofence check |
| While using the app | ✅ Recommended permission duration |
| Only this time | Acceptable for single inspection sessions |
| Don't allow | ❌ Will prevent inspection from proceeding |
!!! warning "Always Grant Precise Location" The geofence check requires Precise location access. Approximate location may cause the agent to appear outside the 40-metre radius even when physically at the property.
Step 2 — Inspection Details (Before Address Verification)
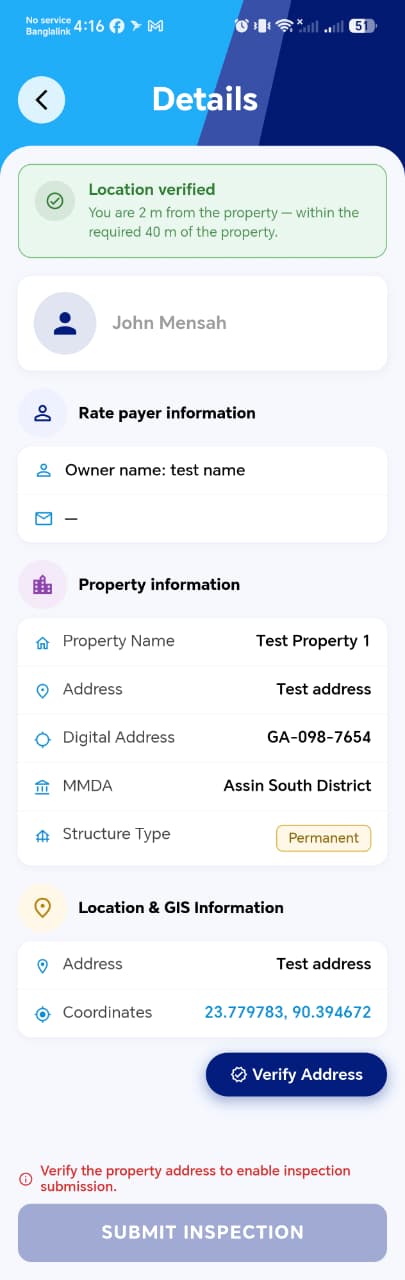
Once location is granted, the Details screen loads showing:
Location Verified Banner
A green banner at the top confirms the geofence check passed:
✅ Location verified You are 2 m from the property — within the required 40 m of the property.
!!! info "Geofence Radius" The agent must be within 40 metres of the property for the inspection to be enabled. If outside range, the banner will show an error and the Submit Inspection button remains disabled.
Agent Information
Shows the logged-in agent's name (e.g. John Mensah).
Rate Payer Information
| Field | Description |
|---|---|
| Owner name | Linked rate payer's name |
Rate payer's email (shown as — if not set) |
Property Information
| Field | Description |
|---|---|
| Property Name | e.g. Test Property 1 |
| Address | Physical address |
| Digital Address | Ghana Post address (e.g. GA-098-7654) |
| MMDA | District/Municipal area |
| Structure Type | e.g. Permanent badge |
Location & GIS Information (Before Verification)
| Field | Description |
|---|---|
| Address | Current registered address |
| Coordinates | GPS coordinates shown in blue |
| Verify Address button | Must be tapped to confirm or update the address |
!!! warning "Address Must Be Verified" The red warning at the bottom states: "Verify the property address to enable inspection submission." The Submit Inspection button remains greyed out until Verify Address is completed.
Step 3 — Address Verification
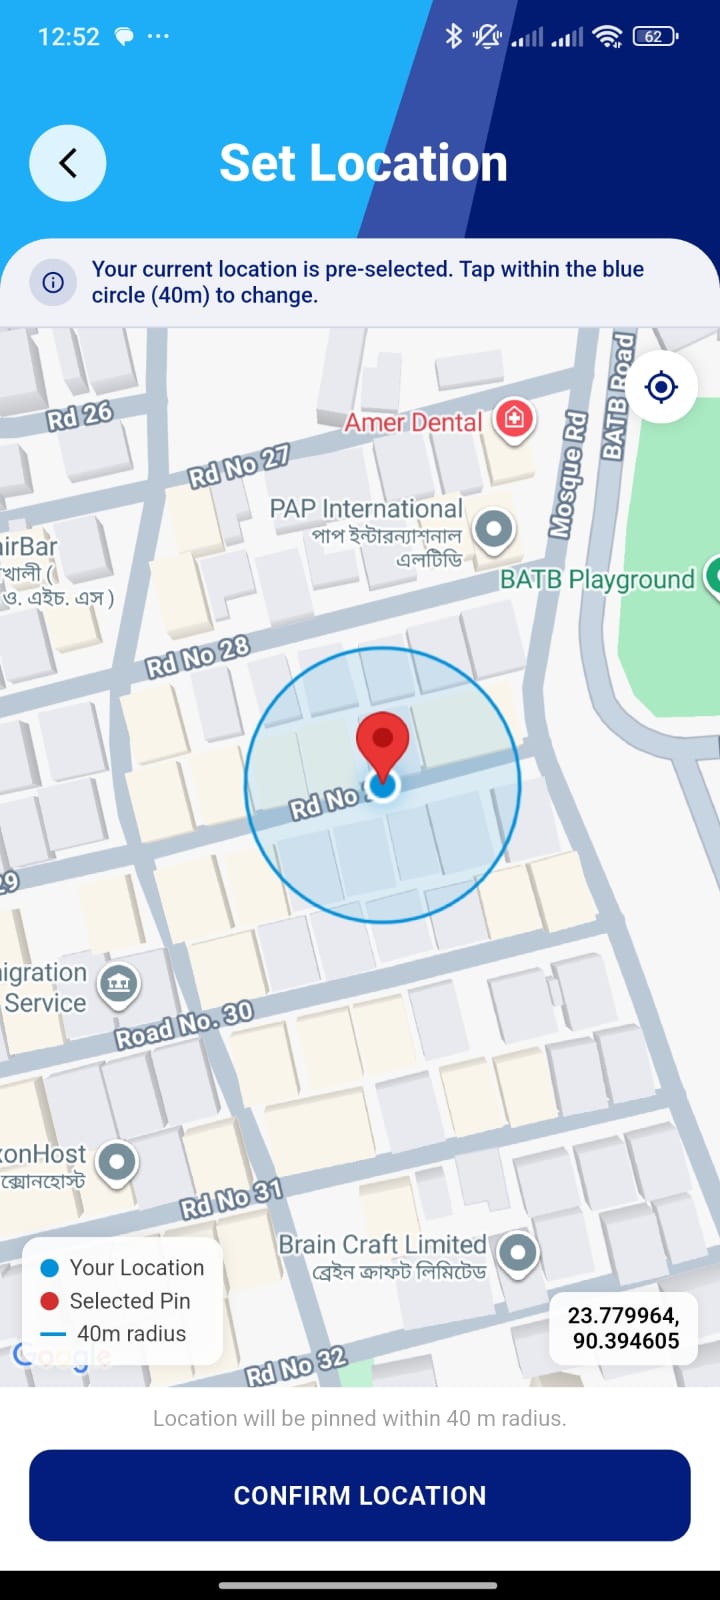
Tapping Verify Address opens the address verification flow where the agent:
- Manually types the address, or
- Confirms the existing address via checkbox if already correct, or
- Auto-fills from the LVD database
The agent also sets/confirms the property coordinates on a map showing the 40-metre radius boundary.
Step 4 — Inspection Details (After Address Verification)
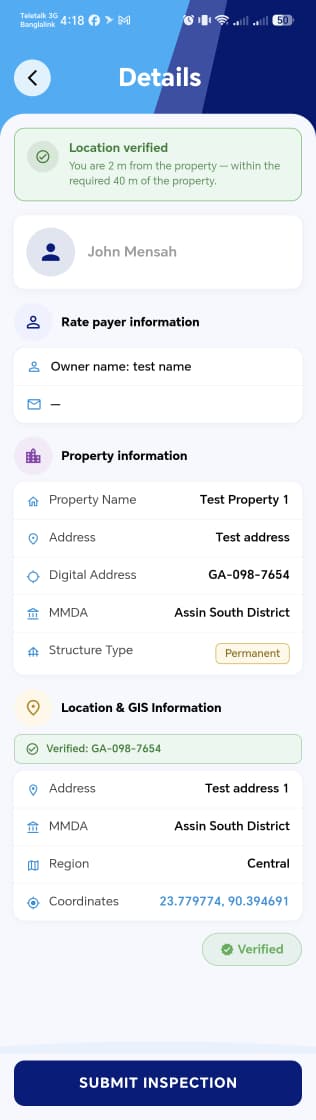
After successful address verification, the Location & GIS section updates:
Location & GIS Information (After Verification)
| Element | Description |
|---|---|
| Verified: GA-098-7654 | Green chip confirms the digital address is verified |
| Address | Updated/confirmed address (e.g. Test address 1) |
| MMDA | Confirmed district |
| Region | Confirmed region |
| Coordinates | Verified GPS coordinates shown in blue |
| ✅ Verified badge | Green badge confirms address verification is complete |
The SUBMIT INSPECTION button at the bottom is now active (dark blue).
!!! success "Ready to Submit"
Once the green Verified badge appears in the Location & GIS section,
the SUBMIT INSPECTION button becomes enabled and the agent can
proceed to submit the report.
Step 5 — Submit Inspection Report
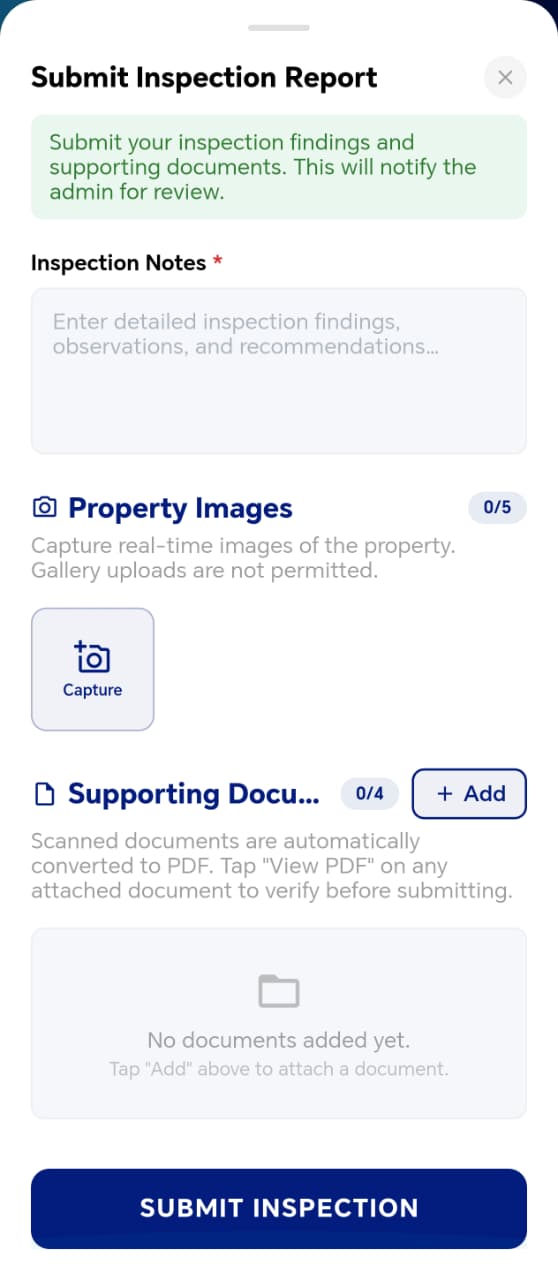
Tapping SUBMIT INSPECTION opens a bottom sheet with the submission form.
Submit your inspection findings and supporting documents. This will notify the admin for review.
Inspection Notes
| Field | Required | Description |
|---|---|---|
| Inspection Notes | ✅ Required | Detailed inspection findings, observations, and recommendations |
Property Images
| Element | Description |
|---|---|
| Counter | Shows images added vs maximum (e.g. 0/5) |
| Capture button | Opens the device camera only — gallery uploads are not permitted |
| Max images | Up to 5 images |
!!! warning "Camera Only — No Gallery Upload" Property images during inspection must be captured in real time using the device camera. Uploading from the gallery is not allowed. This ensures images are taken at the actual inspection site.
Supporting Documents
| Element | Description |
|---|---|
| Counter | Shows documents added vs maximum (e.g. 0/4) |
| + Add button | Opens document upload options |
| Scan option | In-app scanner converts the scan to PDF automatically |
| Upload option | Upload an existing document from the device |
| Max documents | Up to 4 documents |
!!! tip "Verify Documents Before Submitting" After adding a scanned document, tap View PDF to verify the scan quality before submitting. Poor scans cannot be replaced after submission.
Submit
Tap SUBMIT INSPECTION at the bottom to send the report for admin review.
Success & Result
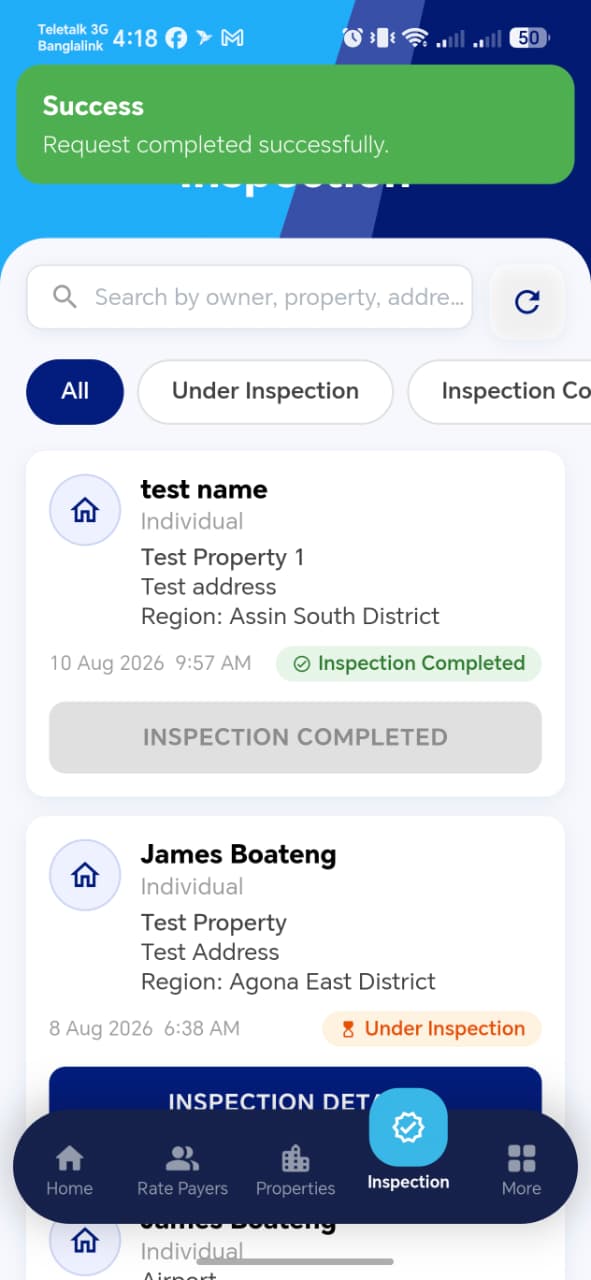
On successful submission, a green banner appears:
Success Request completed successfully.
The property card in the Inspection list updates:
- Status badge changes from Under Inspection to Inspection Completed (green)
- The INSPECTION DETAILS button becomes greyed out (inspection already done)

On the Dashboard, the Property Inspected counter in the Overview section increments by 1.
Inspection Reports
The Inspection Reports screen shows a history of all reports submitted by the agent.
Navigate to: Home → Quick Actions → Inspection Report
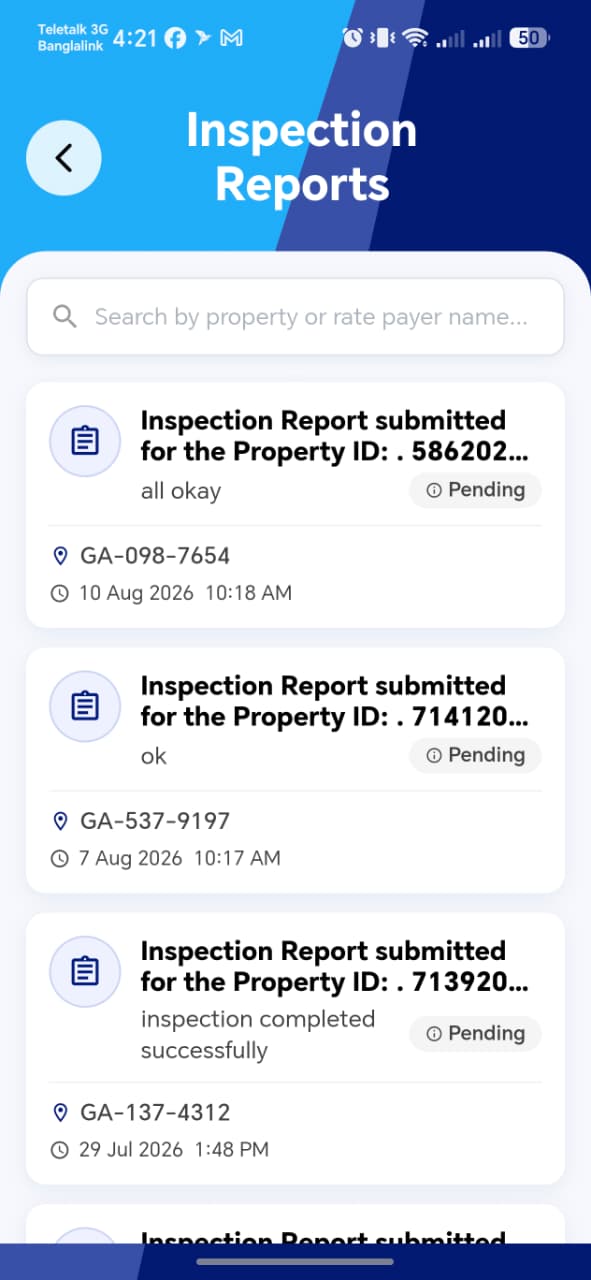
Report List
| Element | Description |
|---|---|
| Search bar | Search by property or rate payer name |
| Report card | Shows property ID, agent notes, digital address, date/time, and status |
Report Card
| Field | Description |
|---|---|
| Title | Inspection Report submitted for the Property ID: . XXXXXXX... |
| Notes | Agent's notes (e.g. all okay, inspection completed successfully) |
| Status badge | e.g. Pending — awaiting admin review |
| Digital Address | Property's Ghana Post address |
| Date & time | When the report was submitted |
Report Details Page
Tapping a report card opens the full Report Details page.
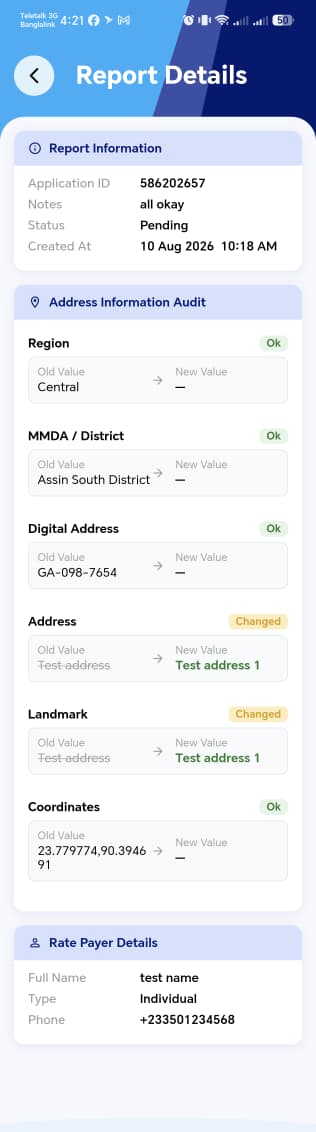
Report Information Section
| Field | Description |
|---|---|
| Application ID | Unique inspection report ID (e.g. 586202657) |
| Notes | Agent notes submitted with the report (e.g. all okay) |
| Status | Current review status (e.g. Pending) |
| Created At | Submission date and time (e.g. 10 Aug 2026, 10:18 AM) |
Address Information Audit Section
Shows a field-by-field comparison of the address before and after the inspection:
| Element | Description |
|---|---|
| Field name | e.g. Region, MMDA / District, Digital Address, Address, Landmark, Coordinates |
| Ok badge (green) | Field value was unchanged during inspection |
| Changed badge (yellow) | Field value was updated during address verification |
| Old Value | What was registered before inspection |
| → New Value | What the agent updated it to |
!!! info "Audit Trail"
The Address Information Audit section provides a complete change log
showing exactly what the agent verified or updated during the inspection.
Ok means the existing value was confirmed correct. Changed means
the agent corrected the field.
Rate Payer Details Section
| Field | Description |
|---|---|
| Full Name | Rate payer's name (e.g. test name) |
| Type | Individual or Organisation |
| Phone | Contact number |
Complete Inspection Workflow
Bottom Nav → Inspection
        ↓
Select property → tap INSPECTION DETAILS
        ↓
Grant Precise Location Permission
        ↓
Geofence Check (must be within 40m)
        ↓ Pass                    ↓ Fail
Location Verified ✅         Out of range ❌
        ↓                    (cannot proceed)
Tap Verify Address
        ↓
Confirm / update address + coordinates
        ↓
Address Verified ✅ → SUBMIT INSPECTION enabled
        ↓
Enter Notes + Capture Images + Add Documents
        ↓
Tap SUBMIT INSPECTION
        ↓
Success → Report sent to admin for review
Test Suggestions
!!! tip "Geofence Pass Test" Go to a property location and open Inspection Details. Verify the green Location verified banner appears with distance confirmation (e.g. You are X m from the property).
!!! tip "Geofence Fail Test" Open Inspection Details while far from the property. Verify the banner shows an out-of-range error and the Submit Inspection button remains disabled.
!!! tip "Address Verification Test"
Complete address verification and verify the green Verified
badge appears in the Location & GIS section.
Confirm the Submit Inspection button activates immediately after.
!!! tip "Camera-Only Test" In the Submit sheet, tap Capture for property images. Verify only the camera opens — no gallery or file picker is shown.
!!! tip "Audit Trail Test"
During address verification, change the Address field value.
After submission, open the Report Details and verify the
Address row shows Changed badge with old and new values.
!!! tip "Dashboard Counter Test" Note the Property Inspected count before starting. Complete a full inspection and verify the counter increments on return to the Dashboard.
!!! tip "Status Progression Test"
Before submitting: verify property shows Under Inspection.
After submitting: verify it changes to Inspection Completed (green).